Growing your own seeds is a great skill to have because it opens up the plant varieties you have access to. When you buy from a greenhouse or garden centre, your only choice is to grow what they have to offer. The availability of seeds is vast, so learning to grow your own seeds opens up endless possibilities.
If you are new to seed starting and want to learn more, check out the full list of seed starting guides we have:
- How to Pick the Best Plants for Your Garden
- Avoid These 8 Mistakes When Starting from Seed
- How to Make Peat-Free Seed Starting Soil
- How to Read a Seed Packet
- 8 Easy To Grow Seeds for the Beginner Gardener
Today we are going to talk about seed starting equipment. In this guide we will take you through the equipment that you need, and provide product recommendations that range in price, to allow you to create a seed starting setup that fits within your budget.
Here is the complete list of items that you need. We will go through each item in detail in this article:
Shelving Unit
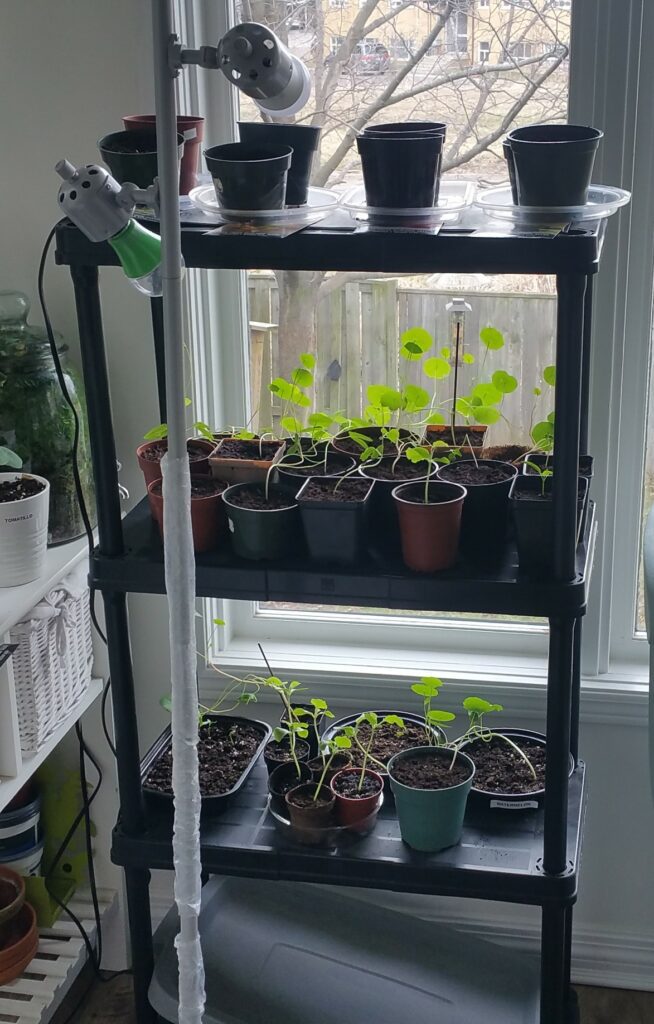


You can grow seeds on a table, windowsill or even on the floor, however it does not beat having a designated seed growing stand. Stands can be affordable, and keep your plants organized without having them take over your entire house. Seeds are small, and seedlings aren’t much bigger, but as the plants grow so do the pots and space that they require. What starts as a small spot on your dining room table will quickly grow into taking up the entire table if you choose to grow without a designated stand.
Stands are a neat and tidy way to grow your plants. They take up minimal space but allow you to grow a lot of plants. If you choose an adjustable unit, you can adjust the shelves based on the height of the plants at the time. However, if you choose a stand without adjustable shelves, having the ability to raise and lower the lights is beneficial.
Some factors that you will want to consider when choosing a stand include:
- Your budget
- Your long term goals
- The size of the shelving unit
Budget
Adjustable stands can range from $50 to $200 depending on their size and material.
Long Term Goals
It’s important to think into the future and if you see yourself growing from seed long term. If you intend to do this long term, investing in a stand that will stand up to time and fits the criteria you need perfectly (ie do you need it to adjust, does it need wheels etc) is the best way to go.
Size of the Shelving Unit
The three main things you want to look at: the width of the unit, the depth of the shelves, and the number of shelves.
Width of the Shelves
Depending on the grow lights you choose for your setup, you want to ensure that they fit the stand. In the past we have used 48″ grow lights on a 36″ stand, which is a lot of wasted space where we have lights hanging over the shelf edges that we can’t grow under.
Depth of the Shelves
This is not critical, but is something that you may want to account for. For this, you will want to look at the size of the stand and the size of trays you want to use to determine if they fit the stand well, with minimum wasted space.
Number of Shelves
Understanding that the bottom shelf and the top shelf are often not used, you will want to account for this.
Recommendations
We included the description of the product, plus a link on where to find it (in case there is ever an issue with the link!). We prefer shelving units that are 48″ wide for our grow lights, as well as a stand made out of metal as we want it to stand the test of time, and also be recyclable at the end of its use. Listed below are shelves that would be a great addition to your seed starting journey.
Under $50
5 Shelf – Black Resin Plastic – 36W x 18D x 72H from Home Depot
Under $200
5 Shelf – Metal – 36W x 16D x 72H from Home Depot
5 Shelf – Adjustable – Metal – 48W x 18D x 72H from Home Depot (this is our preferred option)
Over $200
5 Shelf – Adjustable – Metal with Wheels – 48W x 18D x 72H from Home Depot
Sign up to our newsletter for more gardening tips!
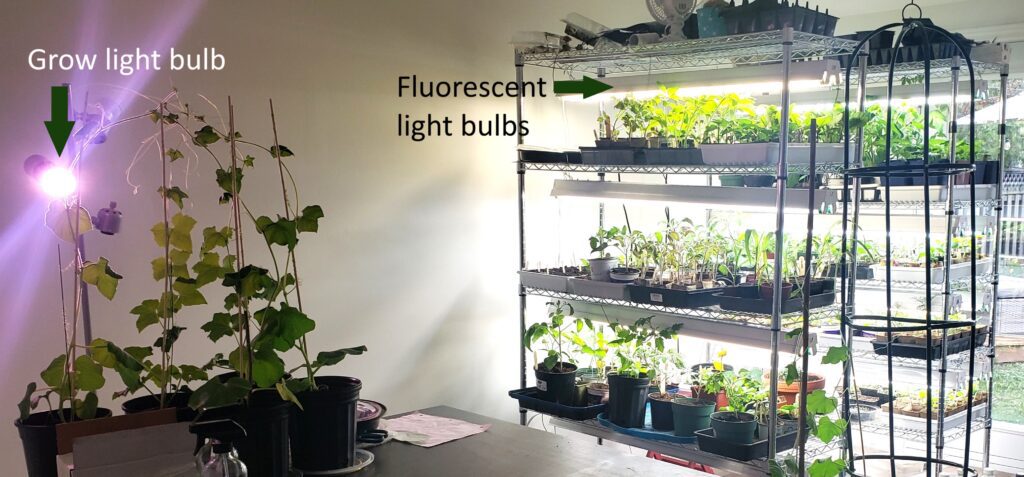
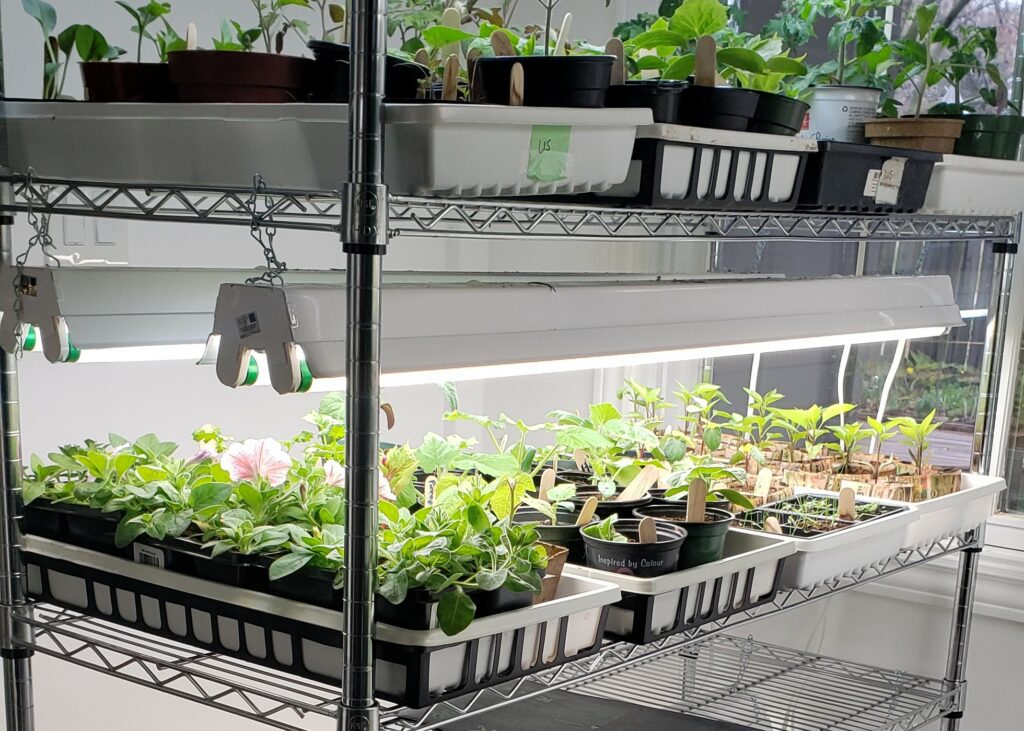
Light Fixtures and Bulbs
You can grow seeds on a window sill, however the winter sunlight in Canada is not strong, and the number of hours is short. The seedlings will likely stretch for light which affects the strength of the plant, so growing under lights is recommended for strong plants.
Budget
Grow lights can range from $7 (grow lightbulbs you can put in any fixture) to over $1,000. Depending on the size of the fixture and whether it is LED or other light bulb types.
Long Term Goals
Grow lights are now readily available in LED form which saves on electricity costs, as you will be running your lights 12 hours a day over multiple weeks. The alternative to LED is fluorescent lighting. If you choose to use fluorescent lighting, the bulbs will lose effectiveness over the seasons, as they run for multiple hours. You will want to factor this in to your budget. Understanding your commitment to seed starting is important so you know if you want to invest in a full LED setup, if you have a shop light at home and want to use lightbulbs, or if you just want a table grow lamp.
Considerations
If you are using a shelving unit, then light fixtures that fit on the unit is the best option to go with (ie 36″ wide or 48″ wide lights). We use commercial shop lights that hold 2 fluorescent lightbulbs. If you choose to use similar lights to our setup, you need a fixture that has space for two lightbulbs to get the full light spectrum (a warm and a bright light). If you buy lights that are specifically branded as grow lights, than you do not need to worry about this.
At the time of this writing, we can no longer find the fluorescent T8 light fixtures that we use. We suspect as LED becomes ever more popular, that the fluorescent tube lighting will become a thing of the past and will become more difficult to acquire. Since we bought our light fixtures over 5 years ago, the price has steadily increased, which will catalyst the phase out of these lights.
Recommendations
Based on this assessment, we will provide you with locations to find grow lights, however they cannot be first hand recommendations as we are in the process of changing over our setup from fluorescent lighting to LED. Therefore, the below links will be provided based on criteria that would fit in with pricing or the shelving unit recommendations we provided, but are not first hand recommendations. A final note, the prices below are based on the total price, not price per light (as some recommendations are for multi-packs).
Under $50
NOMA Grow Light Bulb (can be used in table or floor lamps) from Canadian Tire
22″ NOMA T5 Grow Light from Canadian Tire
Grow Light with Table Attachment from Amazon
Under $200
Barrina 2ft T8 Grow Light – 6 pack – from Amazon
Barrina 3ft T8 Grow Light – 8 pack – from Amazon
Barrina 4ft T8 Grow Light – 6 pack – from Amazon
FloraFlex LED Clone Light – 2 pack – from Indoor Farmer
Heat Mat
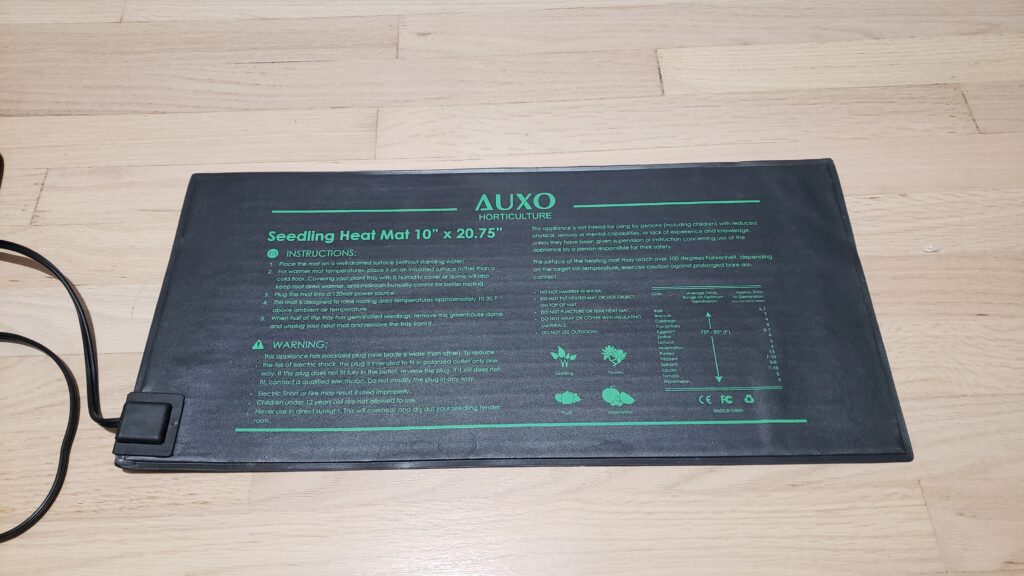
Heat mats are a very useful tool for seed starting. They are affordable to buy, and make a considerable difference in the germination rate and success of many seeds. Heat mats are meant to be used on seeds that prefer warm soil to germinate, which includes tomatoes, peppers and eggplants. Although a heat mat is not required to grow from seed, it will speed up the germination rate and will result in more success with these specific seeds.
Considerations
The main consideration is the size of the heat mat. You want it to be a similar size as your grow trays. The second consideration is determining how many mats you need, based on how many heat loving seeds you plan to grow. The heat mat will stay on 24/7 until your seeds germinate, so you need multiple if you plan to grow a lot, all at one time.
Recommendations
AC Infinity Suncore with Controller – comes as a single or a pack of two from Indoor Farmer
AC Infinity Suncore in multiple size availabilities from Indoor Farmer
Humidity Dome

Humidity domes are clear lids that sit on top of your grow tray. Essentially, you are trying to create a greenhouse effect while your seeds are waiting to germinate. Not all seeds like these conditions, as it makes it warmer and wetter, so be sure to check your seed growing requirements before using this. The benefits of the dome is that it keeps the soil warmer, keeps moisture in the soil for longer, and helps speed up germination. However, it can also hold in too much moisture and cause the seeds to rot. Being mindful of how wet your soil is can help prevent this from happening.
Considerations
There are three considerations with a heat dome. The first is ensuring that the dome fits the size of tray you are growing in. The second is the height of the dome, and the third is if the dome has vents in it or not. When growing seedlings, the dome does not need to be tall or have ventilation, it just needs to fit the tray as you will be taking the dome off as soon as the seeds germinate (to not hinder light reaching the plants). Domes that are taller and have vents in them are generally used for growing microgreens as you want the seedlings to stretch up as you harvest them at their early seedling size.
Recommendations
Seedling Dome 4″ from West Coast Seeds
Propagating Dome Tray Cover from William Dam Seeds
Sign up to our newsletter and get gardening advice directly to your inbox
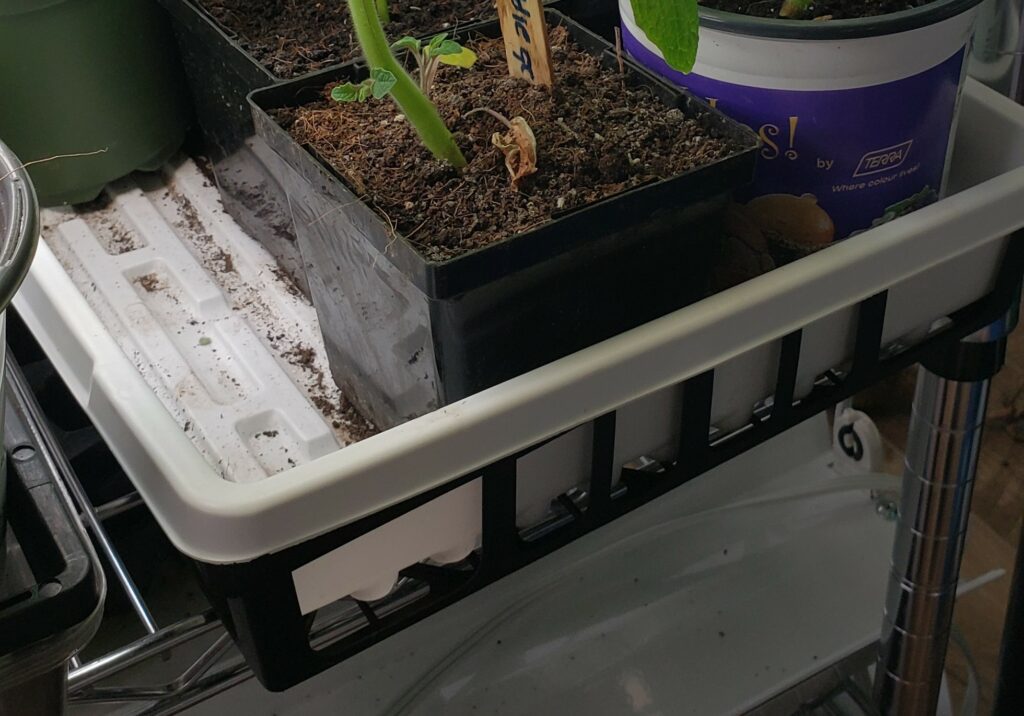
Seedling Trays
Trays are an easy way to grow seedlings and keep them organized. Trays are not required and you can grow in pots, however you will still need something underneath the pots for watering. Pots will get the job done, but they come with some complications. First, pots are quite tall so a heat meat is not effective at warming up the soil. Second, they require a lot of soil in the beginning to start your seeds. Third, the shapes don’t always match so they take up a lot of space because they fit together awkwardly. And finally, it is difficult to put a heat dome over pots because of their size and shape.
That being said, if you have access to pots (because they come from the greenhouse, or people recycle them regularly) and you are on a strict budget, these will absolutely work. When we first got into seed growing we started in pots with a Rubbermaid lid underneath to catch the excess water. It wasn’t a perfect system, but it was our entry into seed starting.
Considerations
Most trays come in a standard 10×20 size, however you can find other sizes as well. Determining the best size for your needs is important. Additionally, trays will come with or without holes. Trays with holes are great if you have an outdoor greenhouse that you can water and let it drain out below, however when growing indoors, trays without holes is best. This allows you to bottom water your seedlings without making a huge, wet mess.
Trays can be very flimsy and break after multiple seasons of use, weight of the plants or the plastic starts to disintegrate from age and exposure to light. The more affordable trays have a shorter lifespan than the more expensive investments. Knowing your commitment to growing from seed, your budget and your personal thoughts on replacing products will help determine which to go with.
Recommendations
Seedling Germination Trays (with or without holes) from West Coast Seeds
Bootstrap Farmer Extra Strength Seed Starting Trays from Indoor Farmer
Cell Packs

These are inserts made specifically to fit into the trays mentioned above. They come in multiple sizes from 128 cells to 12. This means you can own an assortment of trays and upgrade your seedlings into larger cell packs as they grow. The benefit of growing in cell packs is that they are uniform in size and shape and fit into trays perfectly. This allows you to keep your plants organized.
Considerations
It is helpful to have more than one size of cell packs as the plants grow and need to be upgraded. We prefer to do as few upgrades as possible as it is time consuming and can be expensive purchasing soil. Therefore, we don’t recommend owning one of every size possible. Additionally, with a cell pack that holds 128 seeds, they all fit in one tray, but if you upgrade them to 12 cell packs per tray, you will need 10 more trays to hold all of these plants. So understanding the amount of plants you wish to grow will determine how many trays you need to hold the larger cell packs. Cell packs are similar to trays in that they break down easily. Many cell packs available for sale are similar to the ones you buy from the nursery for your annual flowers. Often times they crack or break as you are trying to pull the plant out of the tray. The price of the trays reflect their longevity (ie low price trays equal low longevity). We recommend if you wish to use cell packs to either work with them carefully, or to invest in stronger cell packs that can last longer than a couple of seasons.
Recommendations
Plug Inserts 72 cells from West Coast Seeds
Plug Inserts 12 cells from West Coast Seeds
Bootstrap Farmer Tray 72 Cell from Indoor Farmer
Bootstrap Farmer Seed Starter Pots 2.5″ from Indoor Farmer
Labels
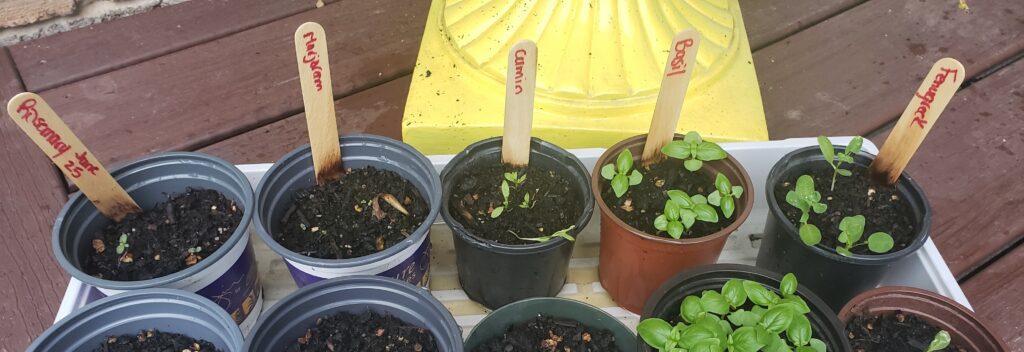
Labels are incredibly helpful when starting from seed. However, be prepared that all gardeners forget to label, lose labels and mix them up! Any way to mix up labels, gardeners have found a way. If you intend to sell your seedlings then labelling is important, however our philosophy here is that labels are a recommendation, and not mandatory.
We like to use popsicle sticks for labels because they are more environmentally friendly than plastic labels, and you can buy them in bulk for an affordable price. Two things with popsicle sticks is; one, generally you have to break them in half to fit under a heat dome, and two, they soak up water. Because they soak up water, the label can smudge a bit, so we make sure to use a pen that won’t smudge when it gets humid or wet.
Mesh Trays
We love using mesh trays for two reasons: we place it under our grow trays and it adds strength to the tray; and once we start hardening our seedlings off outside, we switch over to just the mesh trays so that we can water from above and it will drain away. It also helps rain water drain away and not get caught in the trays.
Recommendations
Lightweight mesh tray from West Coast Seeds
Bootstrap Farmer 32 Cell Insert for 2.5″ Pots from Indoor Farmer (an alternative if you have the Bootstrap pots is to use this to help bring strength and carry the pots together)
Timer
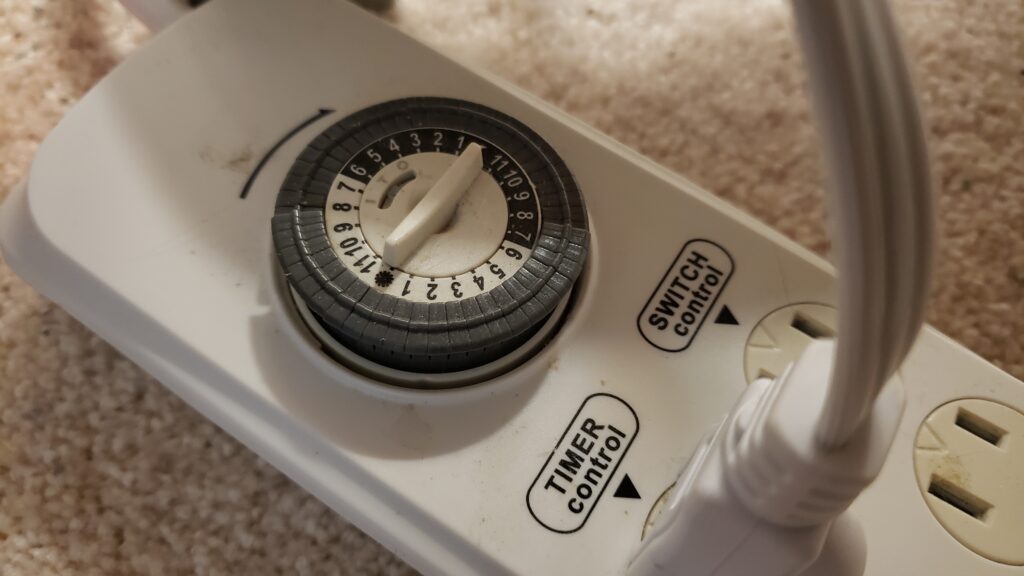
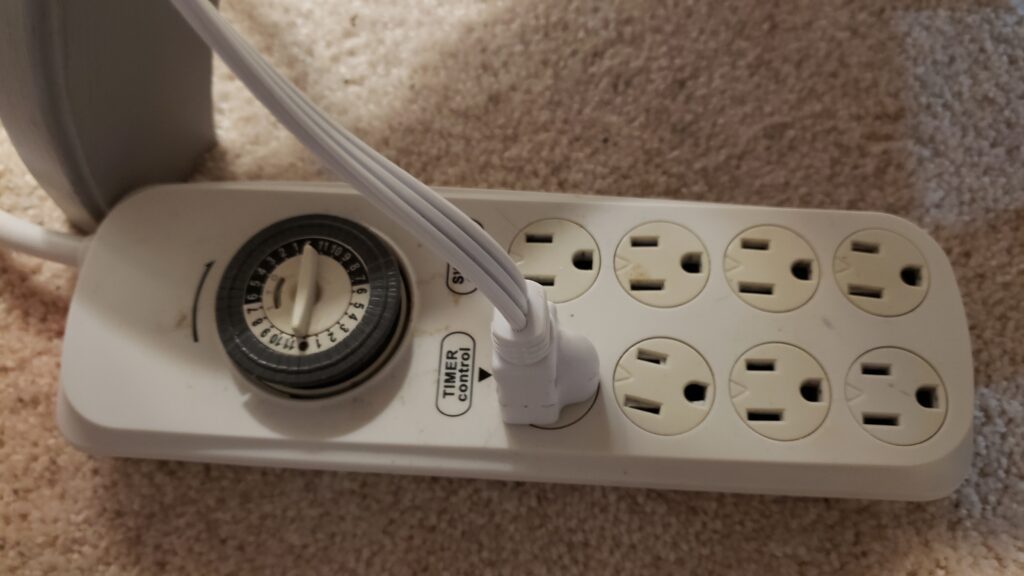
Timers are not required but relieve a lot of effort from us during seed starting season. Remembering to plug in the lights in the morning and unplug them at night is a big responsibility. Having a wall timer or an extension cord timer saves so much effort. There are new extension cords that have an app attached to them as well so you can schedule their on and off time, or even do it from your phone.
We prefer the extension cord with multiple outlets because generally you have more than one light that is plugged in and needs to be turned on and off automatically. Often the extension cords have half the outlets timed with the other half always on. These work great so you can plug your heat mat into the always on outlets, and your lights into the timer outlet.
Recommendations
Autopilot 8-Outlet Analogy Timer w/ Surge Protection from Indoor Farmer
SunBaster 24 Hour Analog Timer from West Coast Seeds
Sign up to our newsletter for more gardening advice
Soil Blocker

Soil blockers are the new, popular kid on the block. These are slowly gaining popularity in the gardening world because they replace pots and cell packs. These are used to make small blocks of soil (hence the name!) that you plant your seeds in. You fill your tray up with these blocks and you allow the plant to grow.
The benefit of soil blockers (other than not needing cell packs anymore) is that they air prune the seedlings. When the roots grow to the point of coming out the sides of the soil blocks, they stop growing because they have nowhere left to go. When roots grow in a plastic pot, they never get to the point of finding the air so this is why they circle the bottom of a pot endlessly. Air pruning creates healthy plants because they grow to the capacity that the soil allows, and do not overgrow and deplete nutrients in the soil.
Considerations
Soil blockers are expensive. However, they are easier to store than a thousand plant pots. If you plan to grow from seed for multiple years, than this is a good choice. Soil blockers also come in different sizes, and have accessories to help when planting up into larger soil blocks. Be sure to understand the measurements before purchasing to avoid getting a soil blocker that is too big, or too small, for your needs.
Recommendations
Ladbrooke Soil Blocker Mini 4 from Indoor Farmer
All soil blockers from West Coast Seeds
If you’ve made it to the end of this article, then we applaud you!
This is a long guide covering all of the seed starting options out there. We hope that you don’t feel to overwhelmed, and know that you can slowly build up your equipment setup. You do not need to get it all at once, and growing in pots with a Rubbermaid tray, on a windowsill is still an amazing way to learn to grow!
We want you to have success, failures and learning as you continue on your gardening journey.


