
In this guide you will learn everything you need to successfully grow from seed. This information applies to vegetable and flower seeds alike. You can even apply this information to fruit seeds such as avocados!
We will cover everything you need to start growing from seed including; the equipment, soil and seeds. Then you will learn all about the seeds; from important definitions to how to plant them. Finally, you will learn how to care for the seedlings once the seed has germinated.
What you will find in this guide:
Let’s get into it!
What You Need to Start

Equipment
There are different levels when it comes to seed starting equipment. We use the term levels because there are ways to start seeds as a beginner, with products you have at home, and there are more advanced ways to start seeds that require specific equipment. We have an article that goes into detail on the equipment that you need to start from seed that we highly recommend for you to understand the best equipment for optimal results.
The main equipment needed includes: grow lights, containers for soil (ie pots), seeds, and a surface to put the seeds on that can accommodate a light, such as a table. However, we recommend you read the above article for in depth details about each tool, what they are used for, and a general cost for these items.
Soil
Sterile seed starting soil is recommended when starting from seed. Seed starting soil is actually soilless, and contains no soil at all. This is because the seeds don’t need any nutrients to grow, as all of their nutrients are stored in the seed. You will want to avoid using soil from the outdoors as it can carry bacteria or pathogens that can kill small, susceptible seedlings. Seed starting soil can be found at greenhouses and most hardware stores.
We prefer to make our own seed starting mix and recommend this article on how to make your own seed starting soil that is peat-free. The article explains all of the ingredients and why they are useful. Making your own soil is a great activity that allows you to control what your plants are grown in, and can be more economical if you plan to grow a lot of seedlings. Additionally, this is a sustainable alternative to store bought soil which contains peat.
Seeds
You can’t grow seedlings without seeds! One of the most important factors to note, if you are new to growing from seed, is that not all seed companies are equal. Through research, conversations with other gardeners, or experience you will learn that some seed companies are better than others. If you grow from seed and it doesn’t work out, it isn’t necessarily because of something you did. Most gardeners will have a story of an experience where they thought a plant was hard to grow from seed, only to later find out it was the brand of seeds and not the plant itself that was problematic.
Reach out to other gardeners in your area, or friends who garden and ask them for recommendations for their favourite seed companies. Most areas have multiple seed companies that are local to you, which means the seeds are meant to be grown in your climate. However, if you would like some company recommendations, a couple of our favourite seed companies include West Coast Seeds and William Dam.
What we are trying to say is, don’t give up! Whether you have seeds at home, or plan to buy them, we recommend reading our article on making sure you have the right seeds for your garden.
You might also like:
- Avoid These 8 Mistakes When Growing from Seed
- 8 Easy to Grow Seeds for the Beginner Gardener
- How to Read a Seed Packet
All About the Seeds
Depending on the company that you bought your seeds from, the seed packet should contain all (or almost all) of the information you need to plant the seeds and be successful. Using the information in this article, and the seed packet in your hand, you should be in a great place to successfully germinate those seeds!
It is important to read and understand the seed packet when you first start out. As you gain experience and confidence you will know the basic rules that seeds follow and you won’t have to rely on the seed packet as heavily. If you don’t feel confident when it comes to the information parts of a seed packet, we highly recommend reviewing this article on how to read a seed packet.
Subscribe to our newsletter to get more tips and tricks straight to your inbox!
Important Seed Definitions
Here is a short and quick list of definitions that will help you become familiar with seeds, seedlings and how they germinate and grow.
Cotyledon – this is the name of the first two leaves that emerge from the seed. The seed has all the nutrition it needs to sprout the cotyledons which is why seed starting soil has no nutrition in it. Once the cotyledons emerge they can start taking in light to help grow the first true leaf/leaves. As the seedling grows, the cotyledon’s will fall off, or you can remove them safely, without damaging the plant.
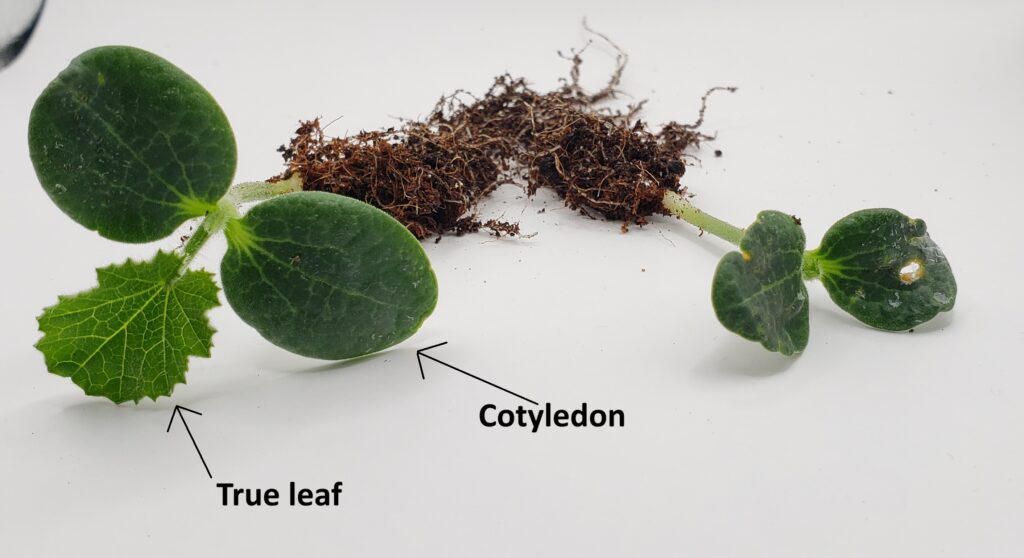
True Leaves – these are the first set of leaves that are actually part of the final plant that will go outside. In the photo above you will notice that the first true leaf on this zucchini plant looks very different than the cotyledon leaves. They resemble the leaves of a mature plant rather than the seed leaves.
Radicle – this is the root that exists inside the seed (along with the cotyledon) that will emerge first when the seed starts germinating. If you place seeds in a wet paper towel, you will notice the first signs of germination is the radicle coming out of the seed.
Stratification – this is a seed treatment that takes place before the seed is planted, and done to mirror natural conditions that would take place in the wild.
Planting Seeds
There are a few factors that must be taken into account when planting seeds; planting depth, seed direction, light/darkness to germinate, and stratification.
Depth
Planting depth is one of the most important factors when growing from seed.
A good seed packet should tell you the planting depth of your seeds. However sometimes you get seeds from a friend, a seed swap, or somewhere else where the seeds don’t come in a packet so there is no information on seed depth. This is the general rule of thumb:
Estimate the width of the seed you are planting, and plant it at a depth that is two to three times the width of the plant.
For example, if a seed is 1mm wide, plant it 2-3mm deep. Always err on the side of planting more shallow than deep, because if you plant the seed too deep the seedling may run out of energy before reaching the soil surface.
Because this guide covers all seeds and not each specific seed, we can only give you a general rule of thumb for seeds, but researching the specific seed your planting + plant depth is the best way to be successful. However, if you like to experiment and feel like freely planting seeds, this rule of thumb will cover a lot of seeds.
Seed direction
This is important, but not necessary to know. The reason we want to talk about seed direction, is because there have been instances where we have started from seed, placed the seed upside down and the radicle has grown up into the air and has not self adjusted back into the soil. This can happen from time to time, and knowing what is happening is helpful for you to flip the seed the other direction, or prepare that this seed may not successfully germinate and grow.
Larger seeds are easier to identify the correct orientation, so we suggest that if you want to plant in the correct direction, to use your efforts on the larger seeds rather than smaller ones. With smaller seeds, plant them normally and focus on planting at the correct depth, and ignore orientation.
The bottom of the seed is the side that has the radicle, or the embryonic root.

Get gardening advice straight to your inbox!
The above photo shows an example of where the radicle end is on 5 different seeds. If you are familiar with vegetables and how they look in their whole form (ie an uncut pepper), the radicle side of the seed is the side that is attached to the vegetable/fruit, or the side of the seed that gets broken off the vegetable/fruit. For example, with a corn seed, it is the side attached to the cob. For beans or peas, it is the side that is attached to the pod.
There is a fairly obvious scar that is present on each of the seeds which helps you identify which side is the radicle side, or the side to plant down.
One final note on seed direction is to remember that it isn’t necessary to plant in the right direction, it just gives a helping hand to the seed when germinating. We don’t want the idea of seed direction to scare you off from planting seeds at all! When in doubt, just plant the seed.
Light/Darkness for Germination
Most seeds don’t care about light or darkness for germination, however it is worth knowing that this does exist. Your seed packet should specify if the seed has a preference, however, if it is not mentioned, assume you can plant it normally. If there is no mention of surface sowing, or light/darkness requirements, follow the depth rule of thumb mentioned above.
In terms of vegetables, the most common seed that requires light for germination is lettuce. If you are growing flowers, the number of varieties that require light is greater, so we recommend reviewing your seed packet or a quick online search.
In terms of darkness, the most common vegetable that prefers to germinate in darkness is onions. There are a few flowers that also prefer darkness, but otherwise the list is quite limited.
As we mentioned above, this list is small and the majority of seeds don’t mind either dark or light so this is something you may want to be aware of, but is not something you need to stress over!
Seed Stratification
Not all seeds require stratification, however some do. This helps the seed germinate more successfully as it mirrors how the seed grows in nature. This can look like placing it in the fridge for a couple of weeks (cold stratification), or even sanding the seed (replicating a seed going through the digestive tract of an animal). It might seem intimidating to stratify seeds, but it is actually quite simple and the seed packet should list any need for this (ie: place in the fridge for 30 days before planting). However, researching your specific seed + stratification will help you learn the specifics for your chosen seed. As you do this, you will learn which seeds need it, and which don’t.
Now that we’ve learned about the seeds, you can confidently plant them and move on to the seedling/sprout stage!
Caring for Seedlings
There are four main inputs for seeds to germinate into healthy seedlings; time, water, light and food. We have two additional bonus inputs to discuss as well! Let’s look at these in detail.
Time
Planting seeds at the right time is important for multiple reasons. In order to plant at the correct time, you will need to know your last frost date. There are two ways you can do this. The first is learning what zone you are in which can be found on the Governments website. Once you know your zone, you can look up the last frost date for your city through a web search. Otherwise, you can just do a quick online search of city + last frost date. Knowing your zone and last frost date ensures that, first, you are planting seeds that will grow in your zone, and second, when to plant the seeds. Most seed packets will identify when to plant the seeds, for example, “6 weeks before last frost”. Using this information, you work backwards from your last frost date to calculate the date to plant.
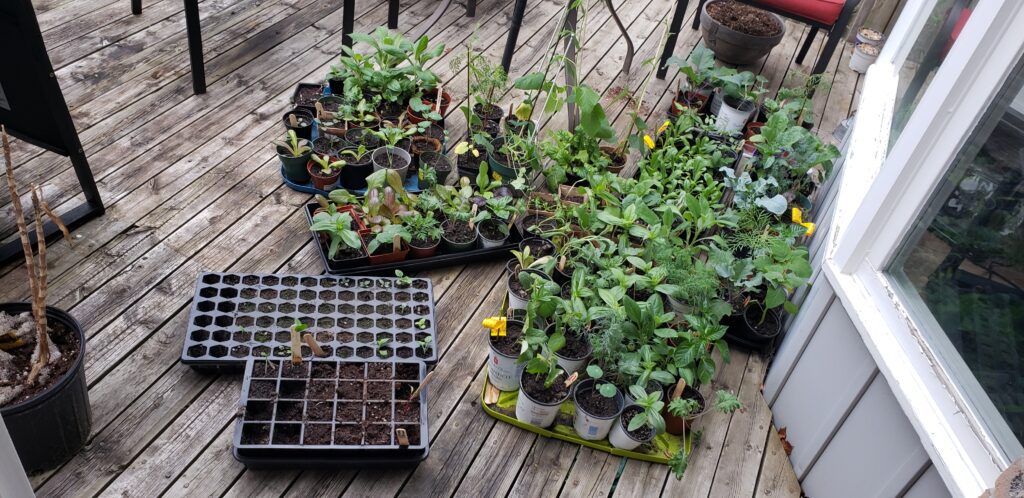
Planting seeds too early can lead to overgrown plants (see plants on the left of the above photo). These plants are more likely to be stunted from growing in pots that are too small for their root system, leading them to use up all the nutrients in the pot. When they are planted out it will take them extra time to start their growth again. Additionally, having plants that are too large takes up a lot of room indoors, and can make seed starting much more expensive with the cost of new pots and more soil.
Planting seeds too late is less of an issue, as there is evidence that once planted out, smaller seedlings will catch up to their larger counterparts in a shorter period of time. The concern with planting seeds too late is that the plant may not reach maturity before the end of the season arrives, leaving you with little to no harvest. This is mainly a concern for plants that have a long days to maturity, where the days to maturity is similar to your total number of frost free days1.
1Note: If you are unfamiliar with the term frost free days, you can calculate this number by counting the number of days between your last frost (in spring) and your first frost (in autumn).
Water
There are a few important rules when it comes to watering seedlings. The most typical, and annoying piece of advice any gardener can get is to not over or under water your plants.
Check your soil regularly to ensure that it has not dried out. You want the soil to be moist, but not wet. If the soil is dry, give it a good watering. If the soil is overwatered, and it appears more like mud than wet soil, you will want to consider repotting your seedlings so they don’t die.
There are a few ways you can water seedlings, however we recommend bottom watering. To bottom water, you will want to ensure you have a solid tray, with no holes. Then, your plants can either be in soil blocks, or in any type of pot that has holes on the bottom.
To bottom water, instead of watering each plant separately, you pour water into the tray and allow the plants to soak up water from below. If your plants are in pots, overwatering is less of a concern, than if they are soil blocks. If your plants are in pots, you can pour as much water in the tray as it can handle without overflowing. Wait 30 minutes, and then dump the excess water out of tray. If you are unsure how much water to use, we recommend placing the tray in your sink so that dumping the excess water is easier. We tend to fill the tray up about half way, and we find that the water gets fully absorbed.
With soil blocks you will need to experiment to determine how much water is the correct amount, without over soaking the soil. You do not want the soil blocks to become muck, however because there is so much exposed soil, they will dry out faster than overwatering plastic pots. We recommend starting with smaller, more frequent waterings until you understand the needs of your seedlings and soil.
There is another benefit to bottom watering beyond not overwatering your plants. When you water from below, it encourages the roots of the plant downward, toward the water. When you water a plant from above, the roots stay shallow because the water is found within the top layer of the soil. Bottom watering helps build stronger plants.
Light

Light is a critical component for growing strong seedlings. It is important to keep the light only a couple inches above the plants. Having adjustable lights is an important feature in your growing setup. As the plant grows, you can adjust the light higher to keep a 2-3 inch gap between the plant and the light. The sun is exceptionally stronger than grow lights, and since plants are meant to be grown in sunlight, the best way to replicate this is by having the lights close to the plants.
If the lights are too far from the seedlings, they will grow leggy which means that they are stretching for light, and growing abnormally long or tall in comparison to how they grow in nature.
The easiest way to manage grow lights is by putting them on a timer. When the seedlings are small, run the lights for 12+ hours a day, and as they get taller and older, you can reduce to 10 hours.
If you do not own grow lights, check out our guide on what you need to grow seeds indoors, where we give light recommendations for multiple budgets, as well as recommendations for timers.
Food
As we mentioned earlier, seed soil is nutrient deficient. However, after the seedlings grow 2 to three sets of true leaves, it is time to upgrade them into potting soil. The seedlings need the nutrients to continue growing and not get stunted.
If you start your seeds at the optimal time (which generally only happens after multiple years), then the potting soil is sufficient in terms of nutrients. However, if you start your seeds early, and grow them indoors for a long time, we recommend that you feed the soil. Because seedlings are contained in a pot, they only have access to nutrients that are contained within this pot. Therefore, adding supplemental nutrients to the soil is beneficial for their growth.
Bonus: Heat
Heat helps speed up germination in seeds. Some seeds prefer heat in order to germinate and it can speed up germination significantly when compared to not using heat. We recommend investing in a few heat mats to help germination be more successful. They are very affordable, last multiple years and keep a consistent temperature that is perfect for seeds. If you would like recommendations and pricing, check our our equipment guide to learn more.
When growing seeds with a heat mat, you will want to keep the mat on 24/7 until the seeds start to germinate. Once you see 50-75% of the seeds germinated, turn the mat off, as it can start to hinder their growth. Be aware, when using a heat mat, the soil will dry out faster. You will want to keep a close eye on the soil moisture to ensure that the seedlings don’t dry out.
Bonus: Wind
Although this is not a necessity to grow seeds, using a fan to simulate wind and circulate air can help grow strong seedlings. The wind from the fan replicates outdoor conditions, signaling to the plant to grow a stronger stem to withstand the wind.
If you don’t use a fan, know that the plants will experience wind during the hardening off stage. There is a risk of stems breaking on windy days while hardening off, which is where the fan can help them grow strength earlier in the process. However, if you do not have a fan, we promise your plants will do just fine!
Stay in the know, join our mailing list!
Planting Seedlings Outdoors
Preparing Your Plants for the Outdoors
A few weeks before your last frost date, or the day you plan to plant out, you must harden off your plants. If you skip this step, you risk damaging your seedlings beyond repair, and losing all of your hard work over the winter months. This applies to any seedlings that are grown indoors only.
Our first recommendation is to organize the seedlings onto trays by cold tolerant and heat tolerant. Some examples of cold tolerant plants include; the brassica family, broad beans, onions and swiss chard. A few examples of heat tolerant plants include eggplant, pepper and tomato.
Cold tolerant plants can be hardened off earlier in the spring than heat tolerant plants. You can begin hardening off cold tolerant plants if the weather is above 0°C. For heat tolerant plants, we recommend waiting until the daytime temperature is above 8°C.
The process of hardening plants off is slow and tedious. It is many gardeners least favourite task when growing from seed. However, this process is extremely important as your seedlings are not accustomed to being outdoors. Indoor seedlings are used to consistently warm temperatures, little to no wind, and have been grown under lights which are significantly weaker than the sun.
Just like people, plants are susceptible to sunburn. Additionally, they can be damaged by strong winds or heavy rains as they have been pampered indoors in a perfect growing environment. This is why the hardening off process is necessary.
Here is a general guideline for hardening off your plants:
Week 1:
Bring your plants outdoors, and leave them in the shade. For the first half of the week, keep them outside for 30 minutes. In the last half of the week, allow them to stay outdoors for 1 hour (still in the shade). If it is windy outdoors, cut the time down shorter or skip that day, as the wind can damage the seedlings. Putting them out during the warmest part of the day is beneficial since indoor seedlings are often used to temperatures of 18°C or more.
Week 2:
Bring your plants outdoors and place them in a spot that receives some sun, but will move into shade. For the first couple of days in the week, leave them outdoors for 1 hour (with some sun, but mostly shade). In the last half of the week, steadily increase the length of time that the plants are outdoors. Keep the plants half of the time in sun, and half of the time in shade. Do this even if it is cloudy out, as the sun does still come through clouds.
Week 3:
Allow the plants to stay outdoors for half of the day. Throughout the week, steadily increase the amount of hours the plants receive sun while outdoors. Keep an eye for sunburn, and if the plants show any signs of sunburn, reduce the amount of sun hours by placing them in the shade.
Week 4:
The plants should now be able to stay outdoors all day. As the week progresses, and if weather permits, you can leave the plants out overnight as well. If the weather is suitable for planting out, seedlings can be transplanted at this time. If the nights are still cold, bring the plants in overnight, and return them outdoors in the morning. Continue this until the weather allows for transplanting.
If at any time the weather turns and the seedlings have to stay indoors for multiple days, you will have to start the hardening off process again (on a modified plan).
When hardening off plants, assess their health each day when you bring them in. Look for signs of sunburn, wind damage, or pest damage.
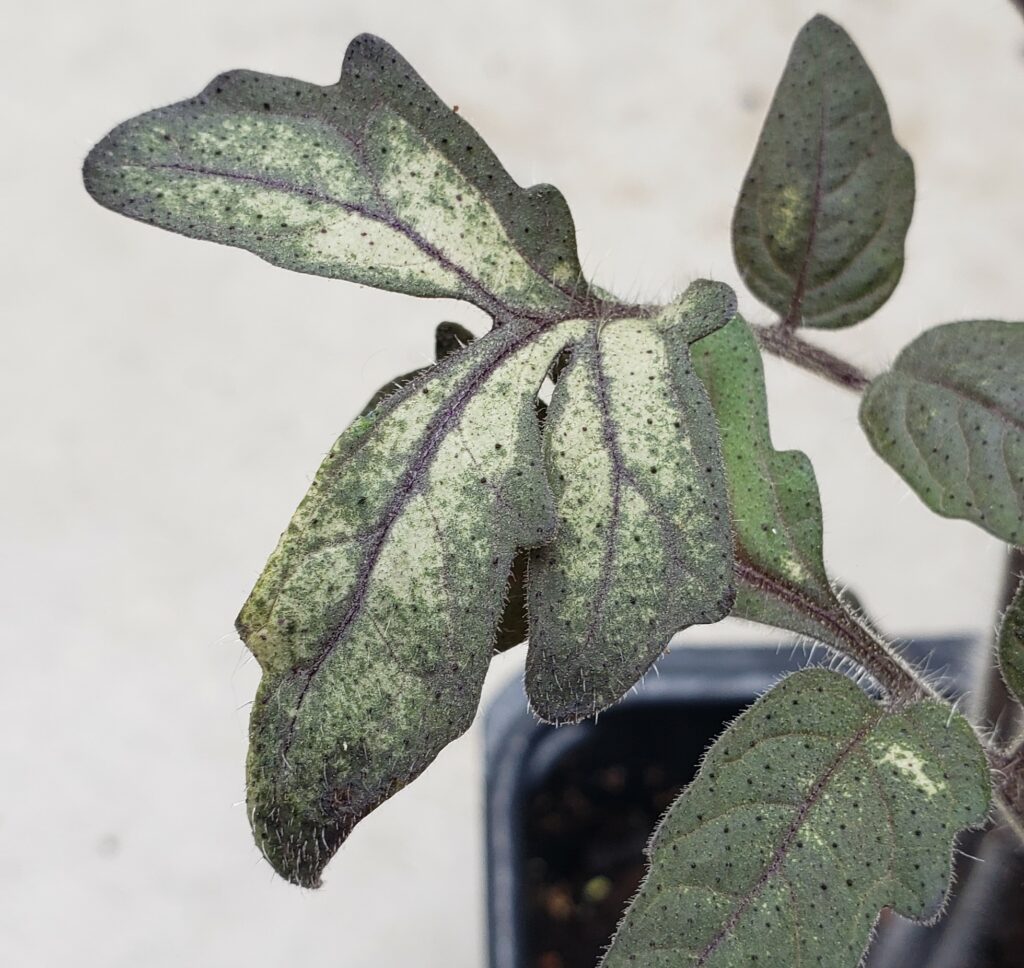
If your plant shows sign of sunburn (portions of white on leaves as seen in the photo above), move the plants to shade immediately and slow down their their introduction to the sun. If the plants show signs of wind damage, put them in a more protected area. If the plants show signs of pest damage, assess the pest that caused the issue and mitigate it. Be mindful that animals may get into your seedlings when left out, so place them in a safe place that is protected from animals.
Transplanting
Once your seedlings have been hardened off, and the weather is consistently warm, it is time to plant out your seedlings!
For cold tolerant plants, we recommend planting out when the 7 day forecast is consistently above the minimum tolerable temperature of the plants you are growing (usually anywhere from -4°C to +4°C). To find the minimum tolerable temperature for the specific plants you are growing, a quick online search of plant + minimum tolerable temperature will help guide you.
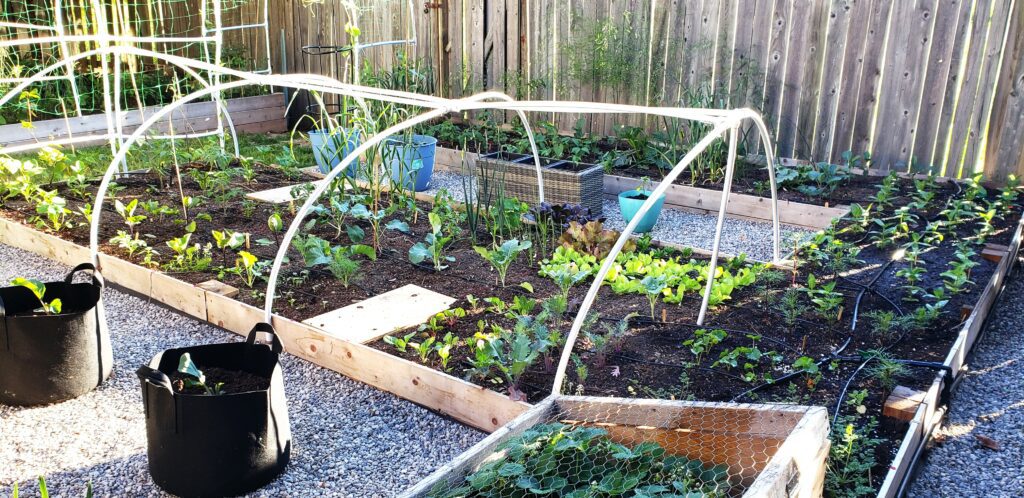
Be aware that this timing will be before your last frost date, so keeping an eye out for potential frost at night is important. Growing the plants under cover is the best way to protect them from cool days or frosty nights. Cover can be anything from a cold frame, a hoop house, or even a bedsheet. If you want to learn more on how to determine if you will get frost, we have a free e-book that can teach you how to determine your likeliness for frost.
For heat loving plants, we recommend planting out when the 7 day forecast shows nights consistently above or near 10°C. Depending on the year, warm temperatures can come before your predicted last frost, or even after. Checking the weather forecast regularly is the best way to confirm the right time to plant them out.
Once you plant out your seedlings, we suggest taking some photos, once a week or so. It always amazes us how fast plants grow once they are outdoors and in their natural conditions.
We wish you the best of luck in your seed growing journey!


